Understanding Group Sets and Groups
Groups and Group Sets help instructors organize students into teams in Canvas. At least one Group Set must exist before any Groups can be created.
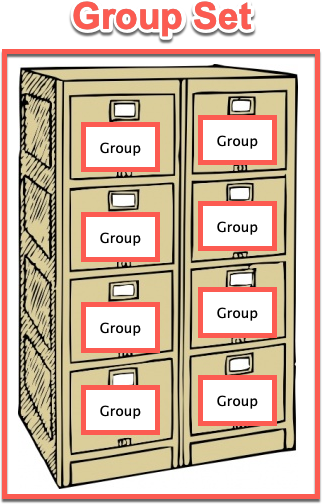
A Brief Analogy
Group Set = A filing cabinet
Group = A drawer in the filing cabinet
Group member = A hanging folder in the drawer
Important: Group activities in Canvas are assigned and associated with the filing cabinet, not the individual drawers (see below). Just as an office can have many filing cabinets, a Canvas course can have many Group Sets. Students can be members of multiple Group Sets but can be a member of only one group per set.
How to Create the Group Set and the Group
We highly recommend that you create the group set and groups before you create the assignments.
- Navigate to SPC's Canvas instance.
- Select your course.
- From the course navigation menu, select People.
-
Select the +Group set button on the left side of the screen.
-
Name the group set.
- Then, open the Group Structure dropdown menu and choose one of the options:
-
Create groups later (this will require you to manually add students by dragging them into the different groups). Visit How do I manually assign students to groups?
-
Split students by number of groups (automatic, requires you to input the total number of groups you want)
-
Split number of students per group (automatic, requires you to input the number of students you want in each group)
Note: If you split by number of students per group, you need to do groups of 3 or more. If you choose groups of 2, and there is an odd number of students in your class, one student will end up by herself. If you want students to be in groups of 2, we recommend creating groups manually, or splitting by number of students per group but then manually creating a group of 3.
Many instructors don't use the self-sign up feature since it allows students to move from one group to another at any point. However, you could enable self-sign up, wait until all students have chosen a group, and then disable it to prevent them from switching groups. Visit How do I prevent students from switching groups in self sign-up groups?
-
Create groups later (this will require you to manually add students by dragging them into the different groups). Visit How do I manually assign students to groups?
- After you place students in groups manually or automatically, select Save.
Note: If you want to create a group set by using a CSV file import, please read How to Create Groups with a CSV File Import.
Creating a Group Discussion
- Select Discussions from the course navigation
-
Select +Discussion to add a new discussion.
- Name the discussion and use the Rich Content Editor to input directions.
- Scroll down to the discussion options. Make sure that Anonymous Discussion is set to Off. Group discussions CANNOT be set as anonymous.
-
Select This is a Group Discussion. Then, select the Group Set from the dropdown menu. You can make different groups for different discussions/assignments, or you can use one or two group sets for the entire semester. It is up to you.
-
Select Save.
-
Select Modules, find the module where you'd like to add this discussion, and select the + inside the module.
-
Select Discussion from the Add dropdown menu, select the group discussion title from the list, and select Add Item to add the discussion to the module.
- Scroll down to the group discussion and publish it by selecting the circle with a line through it. When a green check mark circle appears, it's published inside your module and students will be able to see it.
Creating a Group Assignment
-
Select Assignments from the Course Navigation.
-
Select +Assignment to create an assignment.
- Name the assignment and use the Rich Content Editor to input directions.
- Scroll down to view the assignment options. Check the box next to This is a Group Assignment.
- In the Group Set dropdown menu, select the group set you want to use for the assignment. In the figure below, there are several group sets to choose from. However, you can use the same group set for all assignments, or alternate between two group sets. You do not have to create a new group set for each group assignment or discussion.
- Now, add the assignment to a module and publish it.
- Locate the module and select + to add to it.
-
Select the group assignment from the dropdown menu.
-
Select Add Item.
- Make sure the assignment is published. If there is an empty circle on the right hand side of the assignment inside of the module, select it to publish it. It will change from an empty circle to a green check mark.
How do students access group assignments or discussions?
Students can access group discussions in TWO ways.
-
Select modules, then select the assignment/discussion.
OR
-
Select Groups from the Global Navation bar (under Courses).
Students can access group assignments in ONE way.
-
Select modules, then select the assignment/discussion.
Important note: If students try to access assignments from the Groups button on the Global Navigation, it will not work. They must go in through the modules.
-
Select modules, then select the assignment/discussion.
Guides to Share with your Students
- Using Groups in Canvas
- How to Submit a Group Assignment in Canvas
- How to Participate in a Group Discussion in Canvas
Have Questions? Contact the Academic Technology Support Team
atst@spcollege.edu
Phone at 727-341-3500
(Hours: Monday - Friday 8:30 a.m. - 4:30 p.m. EST).
After-hours or weekend assistance? Contact the Technical Support Center at 727-791-2795 or onlinehelp@spcollege.edu
Want to Schedule a One-on-One or Group Session on Canvas or other instructional technology issues or opportunities?
Schedule 1:1 Support Help with a Member of the Academic Technology Support Team
Related to:
Add comment
Article is closed for comments.